You Got a Standing Desk... So Why Does Your Back Still Hurt?
Switching to a standing desk is a fantastic step toward combating the negative health effects of a sedentary job. It can improve energy levels, increase calorie burn, and reduce the risks associated with sitting all day. However, many people are disappointed to find that simply standing creates a whole new set of aches and pains, especially in the lower back, feet, and neck.
The problem isn't the standing; it's the setup. A poor standing desk setup can be just as detrimental as slouching in a chair. This guide will walk you through the key principles of office ergonomics to help you create a workstation that allows you to stand comfortably and prevent back pain.
1. Set the Correct Desk Height
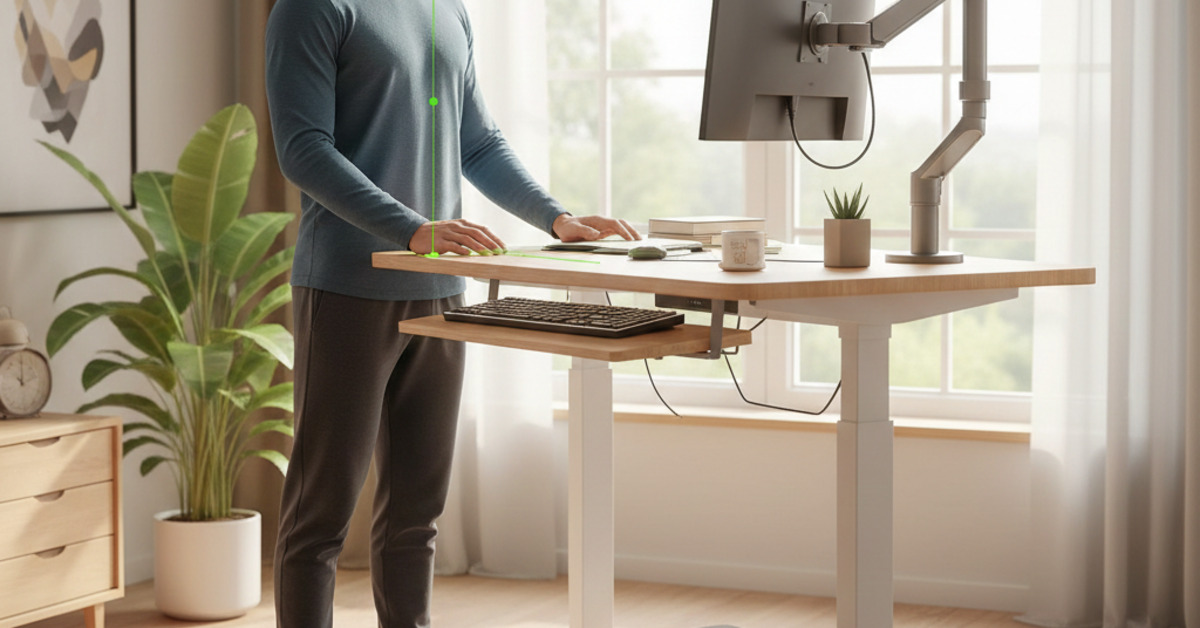
This is the most critical adjustment. If your desk is too high or too low, it will throw off your entire posture.
- The Rule: Adjust your desk height so that when your arms are resting at your sides, your elbows are bent at a 90- to 100-degree angle, with your forearms parallel to the floor.
- How to do it: Stand with your shoulders relaxed and your feet flat on the floor. Bring your desk up or down until your hands can rest flat on the keyboard with your wrists straight, not bent up or down. Your shoulders should feel relaxed, not hunched. This is the cornerstone of desk height ergonomics.
2. Position Your Monitor Correctly
Staring down at a laptop or a poorly positioned monitor is a primary cause of neck and shoulder pain.
- The Rule: The top of your monitor screen should be at or just below your eye level. You should be able to look at the center of the screen by glancing down slightly (about 10-20 degrees) without having to tilt your head.
- How to do it: If you're using a laptop, you absolutely need a separate laptop stand and an external keyboard and mouse. You cannot achieve proper ergonomics with a laptop alone. For monitors, use a monitor arm or a stack of books to raise the screen to the correct height. It should be about an arm's length away from your face.
3. Mind Your Wrists: Keyboard and Mouse Placement
Your keyboard and mouse should allow your wrists to remain in a neutral, straight position.
- The Rule: The keyboard should be flat or tilted slightly away from you. Avoid using the small feet on the back of your keyboard, which can force your wrists into an upward-bent position.
- How to do it: With your desk at the proper 90-degree elbow height, your hands should naturally rest over the keyboard. An ergonomic keyboard or a wrist rest can provide additional support, but the correct height is the most important factor.
4. Don't Just Stand There: Move!
Static standing can be just as bad as static sitting. The key is to encourage gentle movement throughout the day.
- Invest in an Anti-Fatigue Mat: This is non-negotiable for anyone who stands for long periods. A good anti-fatigue mat provides cushioning and encourages micro-movements in your feet and legs, which improves circulation and reduces pressure on your lower back.
- Shift Your Weight: Don't lock your knees. Shift your weight from side to side, or prop one foot up on a small footrest and alternate.
- Sit-Stand-Switch: The ideal workday involves a mix of sitting and standing. Aim for a 30-minute cycle: stand for 30 minutes, then sit for 30 minutes. Listen to your body.
5. Wear Supportive Footwear
Standing on a hard floor all day is tough on your feet, which can have a chain reaction up to your knees, hips, and back.
- The Rule: Avoid standing in high heels, flip-flops, or unsupportive slippers.
- How to do it: Opt for supportive sneakers or comfortable flats. Some people prefer to stand barefoot on their anti-fatigue mat.
By taking the time to dial in your standing desk setup, you can move beyond simply "not sitting" and create a truly ergonomic, comfortable, and pain-free workspace. Your back will thank you.